Showing posts with label Cricut. Show all posts

Friday, August 11, 2017

Getting Ready for Lemonade Stand


I have been seeing such cute lemonade stands on line, that I decided the church kids should get in on the act.  We have been studying "The Fruits of the Spirit" this summer, and I thought it would be cute for them to host a lemonade stand at fellowship for their last Sunday lesson on this topic.  Of course, we are serving, not selling!  along with chocolate chip cookies!

I made these aprons for the kids to wear.  I had a bunch of leftover sheeting (from when I hosted Roman toga parties for the kids in Latin club days!) so I stitched them into serving aprons.  The design was made on Cricut Design Space and cut on Cricut Iron On Light Printable Vinyl with my Explore Air.  I just love how vibrant the design turned out!  Of course, I wanted pink, but so many of the kids are boys this summer, so I went with blue and orange.

I wanted to make a few more aprons last minute, but I had run out of Cricut printable iron on vinyl.  The Jo Ann's near me was out, but they had a different brand of inkjet printable vinyl, so I tried that.  It was a total flop--it didn't iron on nearly as well as the Cricut brand.  I will definitely be getting some more printable iron on from Cricut and keeping it in my stash.  If I were not such a hoarder, we wouldn't have these cute aprons!  And did you check the price of fabric???!  $12.99 a yard???!!  I am so glad I have fabric in my stash to last my old age!

Church lemonade stand is Sunday.   I will post pictures--it will be trey cute!

Monday, July 17, 2017

Woof-woof! Cute Cricut Card!


I had so much fun creating this card!  I needed a card for a small boy and I think this fits the ticket!  The file is from Rob and Bob Studios through Cricut Design Space.  The dog is so cute!  This one is totally paper pieced with a touch of glitter paper.  So easy to cut on the Cricut!    I have since cut one using felt for the dog with Ranger Enamel Accents for the ears.  Lots of texture!  But I have to hand cut the felt using the paper piece as the pattern.  I have absolutely no luck cutting felt on the Cricut--doesn't matter what kind of felt, blade, or mat--I simply can't do it.  But the dog is still cute.  This was supposed to be a Chirstmas design, but I adapted it for a birthday.  It would be so fun to be a kid and open a present and it would be a dog!  Thanks for looking!

Wednesday, June 7, 2017

Looking 'round -- Are you here?


Here's lookin' at you kid!  I made the center card, pictured above, some time ago to use as a "missing you where have you been" card to send to my Children's Church kids that don't show up for a while.  I needed some more of these cards, not in pink (for boys) but I liked the design so I re-did in shades of orange and added an owl motif.  And I decided to augment the circle designs for each card with dimension.  I used a lot of circular "gem" rhinestones I had about and then went with my Ranger enamel accents for extra dimension.  I think the kids will really like these.  (Hopefully they won't in theory get one of these cards!)

The sunglasses images are cut from cardstock with my Cricut Explore.  The sunglasses image is available with the Cricut Access subscription (so handy--I never buy so-called cartridges).  The owl images and circles are cut with punches from scrapbook papers.  Such a fun design!  Oh, and I used metallic paper for the sunglasses lenses.

Thanks for looking!  When did you last play with your circle punches?  (I know you have them!)

Tuesday, March 21, 2017

Elmo's Birthday Pop Up Card


I needed a birthday card for a 2 year old.  Really?!!! What does a 2 year old want a card for, unless to eat it?  But I needed it, so I found this cute little file on Cricut Make It Now.  It is a design from a cartridge called "Sesame Street--Elmo's Party".

I just love Cricut Design Space!  I paid for just the images I need, rather than buy an entire cartridge I absolutely didn't need.  Don't you find that a lot of the images within a cartridge are really just repeated images?  So I purchased just the pieces I needed for this card, and thank you to whoever designed the card so I didn't have to!

But I did have to figure out how to put the pop up inside Elmo together, and that was a struggle.  No Thank You please to Cricut, who does not have an illustration or how-to guide for this.  After ruining two Elmos I thought I had it figured out, but as I looked over the meager directions in the Make It Now section, I realized I was missing something.  I googled "Elmo pop up Cricut card" and found a wonderful video of a lady making the Elmo Pop Up.  Here is her link, in case you want to make a Pop Up Elmo, too:   https://www.youtube.com/watch?v=EErZBqyvr7c&list=PLV4sFhcxLIHLf9ORS9T1NYaYdGq5kWFvo&index=64

And here is my Elmo Pop Up:


Love it!  So bright and cheery for a little one, and maybe even a 2 year old will like the card, besides the taste of it!

Saturday, November 26, 2016

Fall blessings


When my neighbor had a garage sale some time ago, I picked up a bunch of frames for a very reasonable (yes, cheap) price.  I cleaned them up and am now filling them with holiday images, like the one pictured above.

The image is a Cricut design, cut from Cricut vinyl.  I made tons of mistakes, but I can live with this because I think it suits the frame nicely.  After seeing how it looked in the photo,  I did use my heat gun on it to sort of minimize some of the mistakes and it does look better.

Some things I learned:
  1. Don't reverse weed a design like this.  You keep getting stuck to the vinyl and transfer paper, then it loses its tackiness.
  2. Don't clean the glass with Windex right before you apply the design.  I am not sure my glass was completely dry.
  3. Use a different vinyl.  I am going to order some 651.
Despite the problems, I still like the finished product.  It looks good in my dining room and reminds me to give thanks for the blessings I have been given, some of which include:
  1. The ability and resources to be able to craft.
  2. A beautiful house in which to display my creations.
  3. A loving and supportive husband who indulges my hobby.
  4. An abundant lifestyle that allows time for leisure and play.
  5. Good friends and family who graciously receive the creations I make.
Thank you for looking and may you have a blessed Thanksgiving season.


Friday, November 18, 2016

Advent Christmas Tree


This is my little (11.5" tall) Advent Christmas tree I designed with the help of Cricut images.  The base tree was adapted from the Tablescapes cartridge and the numbers were printed with the help of the new Natalie Malan Christmas cartridge I got with my purchase of the November digital bundle Mystery Box.  Behind the numbers in the open squares you can put stickers or scriptures to open up each day of Advent.  Our church was looking for projects for our Advent Workshop and I thought this would be great.  I could cut out the green base ahead of time and the participants could put it together at the workshop.  Of course we would add a topper of a star or ribbon for a finished project.

Thursday, November 17, 2016

Stamping Wreath cards


Here is a quick post of some wreath cards I have been working on.  I used Rubber Stamp Tapestry peg stamps paired with some DCWV cardstock and folded cards I have been "hoarding".  Background die shape cut with my Cricut, as was the white wreath background.  These will make ready "get well" or "thinking of you" cards to send spur of the moment.   Thanks for looking!

Wednesday, November 16, 2016

Autumn Cricut Card


This Cricut Explore Print Then Cut file is in the Make It Now section of Cricut Design Space.  It consists of a printed background of various color leaves and then a black precision cut overlay.   I love it and it was really easy to put together.  Good news, since I had to make 24 of them!  Yep, 24!  They were for the college kids at church this month.  I added a gift card holder to the inside and a stamped greeting.  I hope the kids like their goodies!  If you have a Cricut Explore machine, check out the file:   https://us.cricut.com/design/#/landing/Fall/project-detail/6905

Monday, November 7, 2016

New Cricut Cards!

This week I purchased the Cricut November Mystery Digital Box.  The offer includes five digital cartridges:  

  1. J Goode Holiday Designs
  2. Natalie Malan Christmas Florals
  3. Anna's Christmas Greetings
  4. Kim Byer's Oh What Fun
  5. Kim Byer's Pie Oh My

I have been playing around with what I can do with these images in terms of productive practical application.  Here are a couple of cards I made and some observations on these new "cartridges".  I use the term "cartridge" loosely because they are simply digital sets.  No physical product is involved.


The first card I made, pictured above, is an example of a one-layer image attached to a separate folded card.  I wanted to make some quick Christmas cards that do not take a ton of cutting and assembling.  The digital sets I purchased are ideal for this application.

The one layer consists of a series of images that I attached in turn to my basic white rectangle used for the card front (5 1/4" x  4").  The first image is a rectangle tag that I changed to a "print" option from the default "cut" option in the Christmas Florals cartridge.  I changed the color of the tag to a blush pink to match the blush pink banner offered in the cartridge.  By the way, I had to call Cricut to learn how to use the banner images.  The way the cartridge is designed, you print a whole sheet of various pink banners.  In order to use just one of the banners, you have to change the default "print" option to a "cut".  Then the "contour" button lights up and you can delete all but the banner you want and add it to your card.  You can then add text.  I was only able to get a "write" option for my text but that was no problem.  I used a Precise V5 black Extra Fine pen to allow the Cricut to write the text when it cut the project.  BTW a big shout out Thank You to Julie at Cricut for helping me figure this out!

I also added one of the Christmas Florals scalloped squares images to the center of the pink square, and attached.  I then added the darling Christmas Santa-hatted bear from the Kim Byer's Oh What Fun cartridge to the center of the floral square and attached.  I thought the reds of the Santa hat and banner closely matched the Christmas Florals red flowers.

After cutting out my project with the Cricut I added a white eyelet and a bit of ribbon to the hole in the pink tag image and placed my project onto a pre-made A2 size folded blush card.

If I do this project again, I may add some text to the banner on the center bear first.  It seems a little empty there.

Here is the second card I made:


This time I made a 5 1/4" x 4" rectangle and filled it with one of the 6 pretty patterns that come with the Christmas Florals cartridge.  I also inserted the plain tag image from Christmas Florals, sized it to fit the card front, and filled it with another pattern (hard to see in the photo above--it's a very light pink text pattern).  Remember, I have to attach each step of the project to make it one layer overall.  I added one of the Christmas Floral banners this time, and instead of using one of the default cartridge colors (grey, pink, dark pink, light green, or white) I changed the color of the banner to a maroon.

 Remember I had to change the banner option to cut anyway to manipulate it, so now all the color options of Design Space are available. (The Christmas Florals cartridge has a tag already designed with this saying, but I wanted to be able to manipulate the image so I could vary my text if I wanted to.  Practicing designing my own tag using the cartridge elements allowed me to learn how to do this.)

Since my banner was so dark I wanted to use a white text.  I chose a Watercolor Brush Font I purchased separately from the Mystery Box.  After attaching all and making sure I had a print option chosen I added the cute penguin from the Kim Byer's Oh What Fun cartridge.

Hard to see, but after the Cricut printed and cut the rectangle, I added a ribbon and a jingle bell to the tag and pasted it to a pre-folded A2 white card.  Next time, I am going to add some fuzzy felt or other material to the penguin's muffler.

Thanks for looking!  If there is interest, I will post my Design Space files for these cards so maybe you could make them too!

Sunday, September 18, 2016

Thank Ewe!


Many of you will recognize (I hope my picture didn't turn out that bad!) the image above from Cricut. Simple Pop Up Cards.  And trust me, this card is simple!

And it turns out, this card was perfect for our Childrens' Church today!  I pre-cut all the pieces for the card, pre-folded the pop up portion, and even a four year old could put it together!  (I did cheat a little and put the glue onto the sheep's legs from my small glue applicator, so glue wouldn't get everywhere!)

We were examining the story of God going to find the lost sheep, and after we exhausted the ideas in the provided curriculum, I let the girls (yes, all girls today, aged 3-6) have some real fun and make a card they could give someone to let them know how much they care, like God cares for us.

One thing this card does not provide, however, and that is a design for the front of the card.  (You are of course looking at the inside pop up portion in the photo above.)   So with the help of Cricut again, this is what I came up with for a simple front design:


I purchased the BAA from the Animal Kingdom cartridge (yes, I know I could have made it myself, but after several flubbed tries I went with this pre-made image--easy peasy!

We layered the BAA onto a white shipping tag, added some very fun feather-boa like yarn, and layered all onto a red and white background piece.  The kids had some farmyard themed red and white checks.

Whenever I am in a quandry about a craft or project we can do in Children's Church, I often turn to Cricut for ideas.  Booklets, stickers, pictures--all are in easy reach.  Thank Ewe, Cricut!

Wednesday, August 31, 2016

Tropical Shaker Card


Sometimes you just need a little bit of color in your life!   I made this card (idea from Rubber Stamp Tapestry and Lindsay Weirich) with just that in mind.

First of all, to give credit to Lindsay, here is a link to her card and video:

             http://ideas.pegstamps.com/2016/06/11/aloha-card-selective-die-cutting-technique/

  Here are the details of my card:

1. I used my Cricut Explore to cut a shape that I could use as the window of my card.
2. I traced around the shape with a pencil onto the center of a 5 1/4" x 4" white mat.
3. I stamped the troical flower and foliage images using Memento inks and the Aloha peg set from Rubber Stamp Tapestry, stamping some of the images around the penciled shape and some of the them extending into the penciled shape.
4.  Following Lindsay Weirich's advice, I used color dusters to add in shades of blue and yellow around the penciled shape.
4. I cut out the shape, cutting around the images that extended into the shape opening.
5.I then made my basic shaker card with acetate covering the window.  Sentiment at top is from Hero Arts.  The colorful birds (Inkadinkado) were stamped in the center of the folded white card and colored with Copic markers to match the colors of the Memento inks.  
6. The shaker is filled with some fun tropical confetti I found in the party section of Hobby Lobby.
7.  Lastly, and I don't think you can see it in this photo, I went over the stamped flowers and foliage with Spica glitter pens, matching the colors of the flowers.

The main difference between my card and Lindsay's is that I used my Cricut to cut my shape, rather than using a physical die.  I love using my Cricut whenever I can when I die cut.  I have the Cricut subscription so I have access to thousands of images.  In this way I don't have to purchase lots of expensive physical dies to get variety in my cardmaking.  Here is more information about the Cricut Explore:

http://us.cricut.com/home/

I am sending this card to someone who needs a little cheer in her life.  Wouldn't it be fun to get this card in the mail, along with the bills and junk?!!

Tuesday, February 2, 2016

Bunco Party!


Aren't these little guys adorable?  My sister hosted a bunco party in January and we thought these cute frosty little penguins would look great on the bunco punch cards.  The penguin is imported from Cricut Design Space and is a Make It Now project.  There is a penguin for every season!  I have designs on the little Valentine penguin next!
     We also imported the pattern for the background and made the background, the featured penguin, and the lettering (from A Child's Year Cricut cartridge) into a Print Then Cut.  Due to technical difficulties, we had to cut the large die separately and paste it onto the front of the card, along with the little sequin snowflake.  The die is altered from an existing Cricut image.
     Here is a picture of the cards on the lanyards used for the party:


It was a fun bunco party, but it was also a party to make the cards!  Thank you Cricut and Design Space!

Tuesday, April 14, 2015

Special Delivery Birthday Balloon


Here is a fun birthday card I put together recently.  I got ideas from a number of sources.  I saw a video by Jennifer Maguire where she glittered a word diecut letter by letter and then raised it up on a foam diecut.  I die cut my words from Cricut and built up layers of cardstock--I think about 4--glittering the top layer letter by letter.   I tried making the balloon with cardstock, but it was so thick it wouldn't fold nicely so I used paper from Hobby Lobby.  Again, the die cut is from Cricut, and you have to make 3 layered balloon images to make it 3D.  I got the idea for the saying on the front of the card from Pinterest, and I let my Cricut do the writing!  So much nicer than my handwriting!  I love this writing feature of the new Explore!  The whole card was very easy to design in the Cricut Design Space.


Sunday, April 12, 2015

Belated Easter post

Easter went fast this year!  We did finally finish eating all of the Easter feast by about Wednesday, though.  This little project was done for a craft activity at a local children's Easter Egg Hunt.  While all ages could participate, the real devotees were little girls about 9 or 10 years old.  Oh, I found out Washi tape is a real hit with kids!  
   The first thing everybody did was make a small Easter basket which I had pre-cut from a Cricut file.  The children then decorated their basket with washi tape.  Then we decorated some eggs with washi tape to put into the basket.  We used plastic colored eggs (of course!) although the washi tape looks really brilliant on real white eggs.  The children loved tearing off that washi tape and covering everything with it!  
   This little banner was the highlight of the day (after the egg hunt, of course).  I cut out some Easter egg shapes from a Cricut file, and some lettering to spell out EASTER.  We covered the eggs with strips of colorful washi tape, backed the eggs with some scrapbook paper also cut into the shape of the eggs, punched some holes, added our lettering, and ended up with a really cute little EASTER banner after adding some colorful ribbons.  Some of the younger children, or those with limited time, just made one egg shape and then put a pretty butterfly sticker on top for a colorful Easter ornament.


Friday, April 10, 2015

Cake Pop Up Card

Here is a video detailing my efforts at making a pop up cake card using the Cricut Everyday Pop Up Cards cartridge.  I cut this pop up with my Explore machine.  Using the stylus really helped with some of the folds, although not all of the folds are given a score line in the program.  The Explore helped a lot with making the parts sized perfectly for each other so the parts fit together properly.  No, I have not finished decorating my card.  I still have the front to do and I want to do some more decoration on the cake and the inside of the card as well.


Yes, I know the video is not perfect, and yes, I did move off camera for a little bit, but I think you can get the general idea.  Remember, my camera equipment is not the best in the world.  All my money goes toward my Explore product needs!

Friday, March 20, 2015

Cricut Explore Birthday Card


I am always in need of birthday cards, so I jumped at the chance to make this cute candle card from the Cricut Design Space ideas.  I have a subscription, so I didn't need to pay any extra for the design.  I cut out two of these and will make many more.  I also added some Stickles to the candle flames (not shown in the picture above.)  I liked the idea of a design already planned out and ready to go, including the envelope.  The Explore cut everything out fabulously and all the images line up perfectly.  No sweat, no brain power, just simple crafting fun.

Thursday, March 19, 2015

Showering Blessings


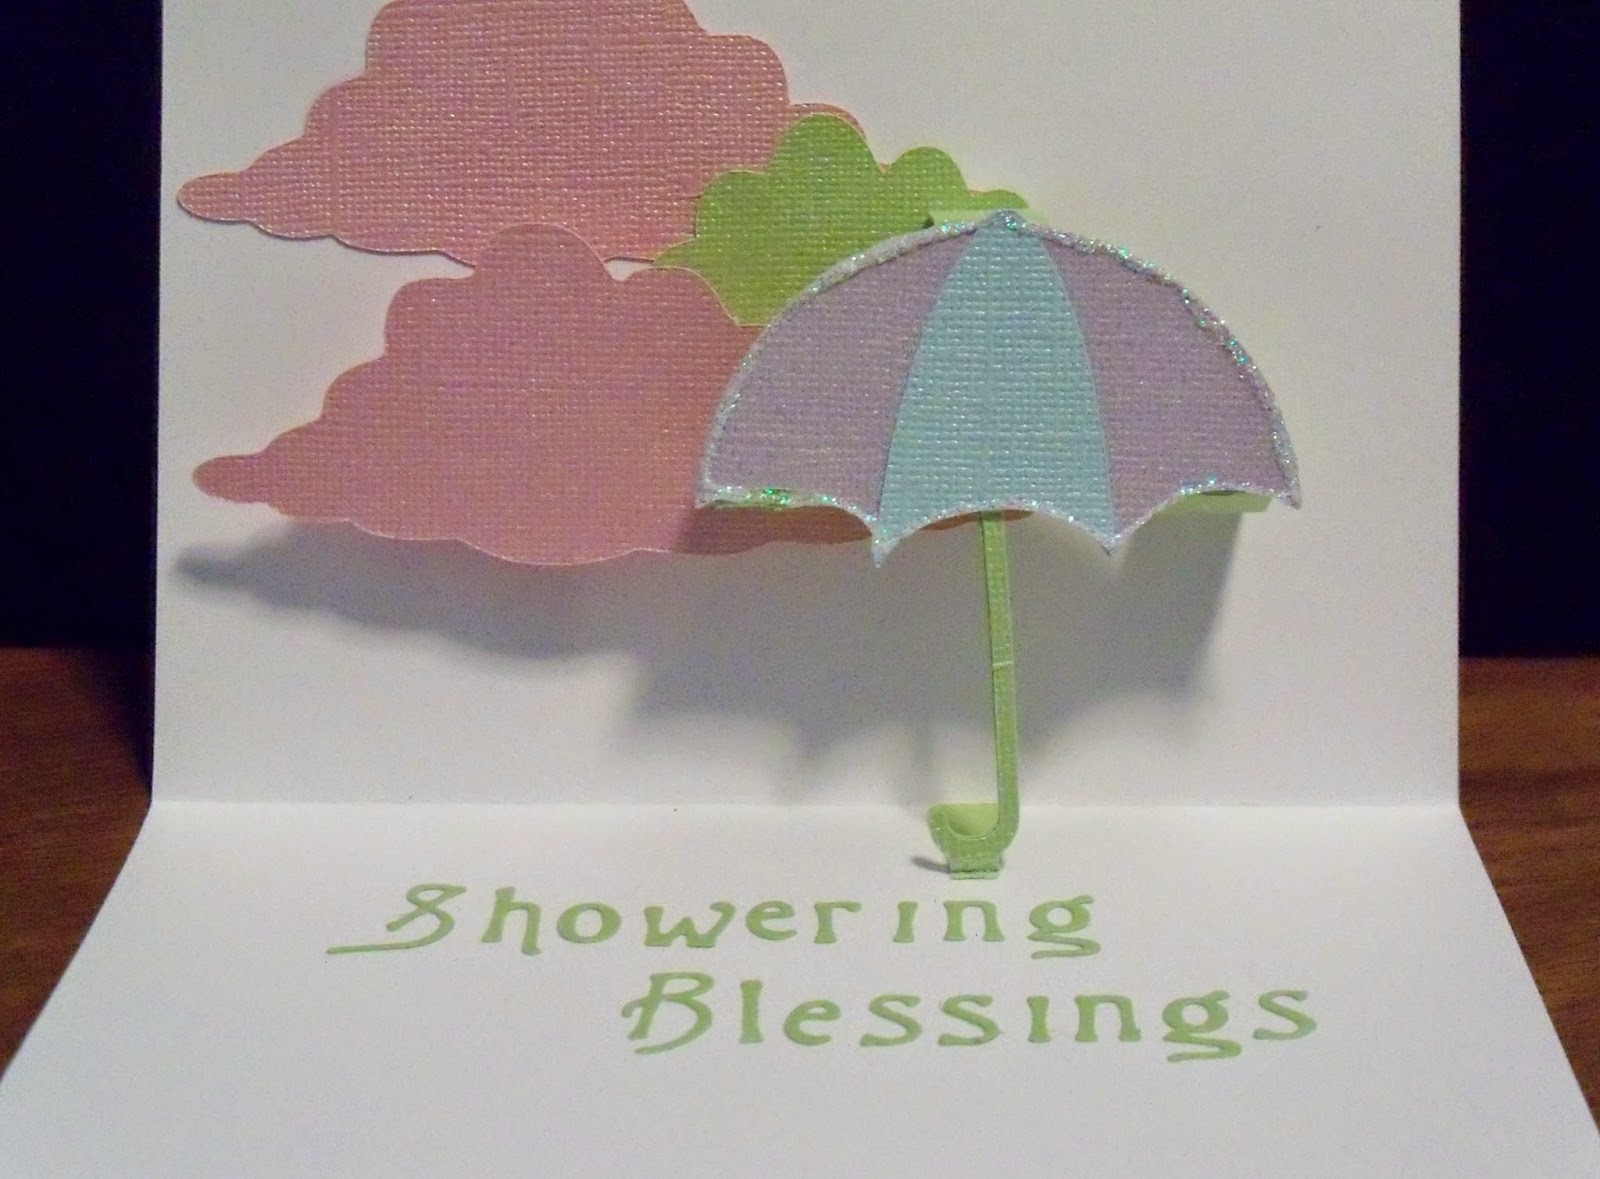
This little pop up card was fun to make, and is very pretty in pastel Bazzill Bling cardstock.  I had leftovers from a couple of baby chipboard books that I made so I made some matching cards.  The pop up umbrella is of course from Cricut Everyday Pop Up Cards cartridge, as is the layered sentiment on the front of the card.  I cut the Showering Blessings from a thin die I have had for a while--cannot remember the name of the company--besides the company is called something else now.  The buttons on the front of the card are cut from Paper Trey Ink button dies.  A few stickles on my umbrella make it shine.  I hope you have a sunshiny day, not a rainy one!  Maybe this umbrella is more of a parasol!

Wednesday, February 11, 2015

Sending a little love

I only made one Valentine card this year, but I made 15 of the same design.  Here is the outside of the card:  


This is a re-make of a card I designed several years ago.  I re-sized it, using my new Accucut A6 window card die.  The acetate forming the window is stamped with a Hero Arts collage stamp from several years ago, using Stazon black ink.  All of the stamps featured on this card are Hero Arts.
     I needed 15 Valentine's cards for young adults.  Nothing frilly, fancy, or feminine, since the card would be received by males as well as females.  I wanted to send the message that they are loved, so I printed that out on the computer and affixed it to the inside of the card so the message would show through the window as part of the design.  I cut the brackets on the outside of the card using my Cricut Craft Room, making sizing a zip.
     Here is the inside of the card:


I wish I could share all of the steps I went through to get everything matched properly and glued together so all of the pieces fit.  Painstaking!  The main problem was I needed to cut a white interior of the card while making the outside of the card red.  It wouldn't help to use a red card with a white backing.  I needed layers to fit my acetate window.   I tried various techniques with each of the 15 cards, yet I know I will still experiment if I make 15 more (not happening!).

Sunday, January 18, 2015

Cricut Pop Up cards

I have been having fun with my Cricut monthly subscription.   This month, I am making pop up cards using the images from Everyday Pop Up Cards cartridge.  While there are lots of fun images to choose from with this collection, the pop up feature itself can be pretty daunting.  Witness the very negative reviews of this cartridge even on the Cricut site.  However, Cricut does supply a PDF pop up instruction booklet, which I downloaded, and I am feature by feature becoming a master (I will not say mistress!)  of how these work.  I probably will never master all of the features, like the little pop up table I so desperately want to make.  Since after tons of searching I did not discover very many projects using the pop up features of this cartridge, I decided to upload my projects to the Cricut website, where you will be able to see them.  Of course you can always see them here, although I am not brave enough to try videos again yet.  The ones I am making are simple enough to put together with the pop up instructions provided by Cricut.
   So let's get started.  Here is the first one I made--the pop up chandelier:


This card is a regular A2 size, 4 1/4" x 5 1/2" so I cut my chandelier to fit inside that dimension and still have the card close without having edges of the pop up peek out.  I cut the pop up chandelier to a width of 5.139 inches and a height of 4.181 inches.  Now you have to realize that my Cricut Expression is not cutting well at the moment--I don't know what is wrong, but something definitely is.  So I hooked up my little original Cricut to the Craft Room and am using that, and so I am restricted to a 6" wide mat.  But I found that for these cards that is OK.  Anyway, I also cut a regular chandelier, not the pop up feature, to about the same size and found that it works as an overlay.  I only had to make one adjustment and that was at the very top of the chandelier.  I used two shades of gray for my pop up.  After glueing on the overlay, I folded the chandelier according to the provided instructions and used the tabs to glue it down on my card.  I used removeable adhesive to gauge position, and when I was happy with placement I used glue on the tabs to hold down the chandelier.  A note on glueing down pop ups:  Glue one side down, put glue on the other tab, carefully fold the card, and hold in place until dry.  That way everything fits when the card is folded as well as when opened.

I cut the letters to spell "bright" from the rhinestone alphabet from the Ribbons and Rosettes cartridge at .75 inches and glued them to the inside of the card under the chandelier.  I used Stickles glitter glue in gold to add sparkle to the letters and the chandelier.

For the outside of the card, I was in a pickle.  I had no idea what images to use.  All I know was that I wanted it to say "I hope your day is..." to go with the "bright" on the inside of the card.  I generated my panel with sentiment from the computer and just added a ribbon and a damask die cut (Tim Holtz flourish).    The power of the card is with the inside pop up!

OK, I was proud of myself, and I wanted to show off what I made!  I hope you like it!  I learned a lot by making this card, and I have cut some more chandeliers for other cards as well.  In the coming days I will share some more pop up cards and how I used what I have learned to improve upon them.

Sunday, September 7, 2014

Winter Wonderland snowflake


This is one of the pages in my newest chipboard album called "Winter Wonderland".  It is a pocket page that holds four large tags.  Each tag acts as a mat for a 4" x 6" photo.  I put little snowflake brads in the hole of each tag.  The focus point on the page is the large decorative snowflake on the pocket itself.  I cut the pocket and tags from the Cricut Mini books cartridge using Craft Room, where I was able to enlarge them to suit my book.  I also cut the decorative snowflake using Cricut, from the Anna Griffin Winter Wonderland cartridge.  I love this cartridge!  I bought the universal overlay to use with it, since it is a newer cartridge that does not come with an overlay.  Also, the instruction book is very much smaller, and I find it a lot easier to read than the older format, especially for layering images.  I layered blue and white cardstock to make the snowflake, which is Option 26 on the cartridge.  I did not use Craft Room for this project--I just set my size to 3" and all four layered images cut beautifully and layered perfectly to make the snowflake.  I did add a small glitter brad to the center of the snowflake before adhering it to the outside of the pocket.  I know it is nowhere near to snow here, but I do think snow may soon be coming to parts of the country.  I had fun making this page of the book.  The whole mini book is nearly complete--it is a flip album with 6 pages front and back.  I used the blue and brown Magenta paper throughout, supplemented with blue, white, and brown Bazzill cardstock.  Lots of deer and snowflakes!